
It’s time to expand your files and folder knowledge and learn about index files and the file structure we’ll be using for this class. You’ll also create your website’s homepage.
Public_html
Open Cyberduck on your computer. You configured it already, right?
The public_html folder is the folder we use to save our webpages. For this class, don’t worry about the other folders; we won’t be using them at all. The folder we do need to focus on, public_html, is referred to as the root directory our site.
Note: When you first open your public_html folder there might be some default files already in the folder (a folder titled cgi-bin, a default.html file, a reclaim logo file, and a static folder). You can delete everything in your public_html folder so that is empty.
Root directory: the base folder of a website.
Homepages
Homepages operate a little bit differently than other files.
Homepage at the root directory
If we place a file called index.html in public_html, index.html would become the homepage of our website.
Meaning, if you typed in your domain, such as yourname.com, what you’re actually viewing is that person’s index file, located in the public_html folder of their server. Indexes are homepages.
Homepages in folders
You can create other homepages by placing index files in folders. For example, if you created index.html, and placed it the 4010 folder, and navigated to yoursite.com/4010, you’d see that index.html.
Essentially, you can have more than one homepage. Rather than the 4010 homepage being at the root directory of our site, it would live in a subdirectory—the 4010 subdirectory!
Subdirectory: a directory (fancy word for folder) located within in the root directory.
TL;DR: indexes are homepages, and you can have more than one!
Still confused? Read more about directories and subdirectories.
Every other webpage
Most webpages we create for this class won’t be index files. If we wanted to view in the browser a file that is not an index file, we would type in the file path followed by the file extension.
To view project-one.html, which resides in two folders:
www.yoursite.com/nmc/4010/project-one/project-one.html
This should sound familiar to the previous lesson on folders and file paths.
Create 4010 folder and homepage
If you haven’t already, create a folder on your flash drive (if you don’t have one yet, use the documents folder for now) named 4010.
Open Visual Studio and choose file open folder and browse to the 4010 folder that you just created.
Create a new HTML file in Visual Studio Code and save it as index.html. (Need a refresher on how? Refer to this previous lesson.)
This file will become your homepage for this course. You can access this by going to yoursite.com/nmc/4010 or yoursite/em/6010/.
Add content to your 4010 homepage
Wouldn’t it be nice if the homepage of your website said something like your name? Your major? Let’s edit the index.html—the one we just made.
Be sure to include your HTML boilerplate.
Add your name as title between your title tags. In the body of your page, add:
- Name
- Major
- Year
- A fun fact about yourself
Here’s an example of the type of thrilling narrative to put on your homepage:
<!DOCTYPE html>
<html lang="en">
<head>
    <meta charset="UTF-8">
    <meta name="viewport" content="width=device-width, initial-scale=1.0">
    <title>Leah Moss</title>
</head>
<body>

I’m a lecturer at the New Media Institute and have been teaching here since 2006!
Fun fact: Most days I walk or bike to work.
</body>
</html>
Previewing files
Wouldn’t it be nice to see what this file would look like without all the HTML tags?
It’s possible to download a Visual Studio Code extension to do this and we will do so later. For now, here is another easy way to preview html files.
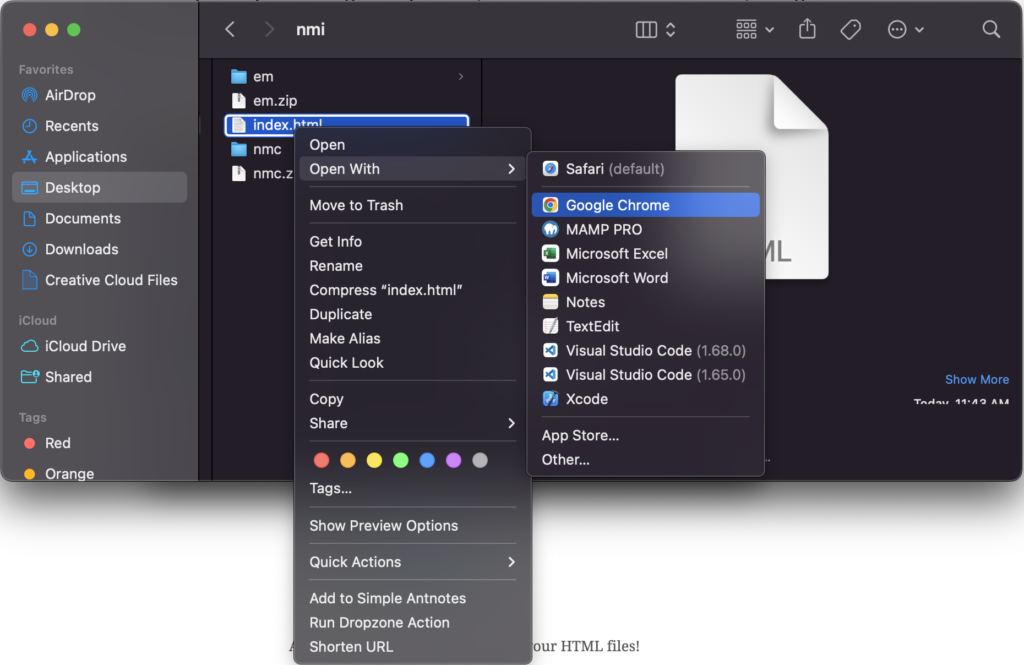
Simply make sure that your file is saved in Visual Studio Code. This step is important and an easy one to skip: use ⌘ + S on a Mac to save your file and Ctr + S if you’re on a PC. (Note: if you’re previewing multiple files, make sure to Save All!). Then, navigate to your finder window, right click your file and select “Open With” and “Chrome.”
You’ll be previewing pretty much every file you will create in this class, so make note of those keyboard shortcuts. Previewing files in this fashion is letting you see a copy of the local version of you file. If you want other people to be able to see this version, you’ll have to upload it to your server.
If you don’t see the changes that you just made, double check that you saved your file and that you’re trying to preview the correct file.
Upload
FTP (another word for upload) both index files to the server.
Drag the index.html page inside of your 4010 or 6010 folder to the same folder on your server. If there already is a file there with the same name, simply over write it.