Customizing CSS in WordPress can seem a bit intimidating or confounding, but once you get the hang of it, it’s actually relatively simple and incredibly powerful.
Where to customize CSS in WordPress
Reading: Beginner’s Guide: How to Use CSS in WordPress for Easy Style Tweaks by John Hughes
The above reading walks through the basics of the primary way1 to customize CSS in WordPress.
In short, from the WordPress dashboard, you’ll visit Appearance > Customize and then choose “Additional CSS.” The article contains good screenshots and examples, but I’ll add here that a great way to think about the “Additional CSS” box is like the notion of a custom.css in Bootstrap. The styles you write here are applied last and therefore override any other styles from your theme. As always, DevTools / the inspector are your best friends, so take the time to get to know them well.
This support article for WordPress.com2 adds a few good additional details.
Targeting Specific Pages
Reading: WordPress: Customize the CSS for specific pages or posts by Rick D'Haene
What we’ve covered so far will help you style all your pages, but what if you want to apply styles to just one single page? It’s not at all obvious at first, but WordPress actually provides a surprisingly simple method for doing so.
As the above reading details, WordPress generates a specific CSS class for each individual page and post. With a little practice and careful thinking, you’ll be able to customize your WordPress site to your heart’s content.
Adding a Google Font to your Additional CSS
While there are several plugins that help you add fonts of your website, it’s surprisingly simple to add a Google Font (or two!) to your WordPress site using just additional CSS.
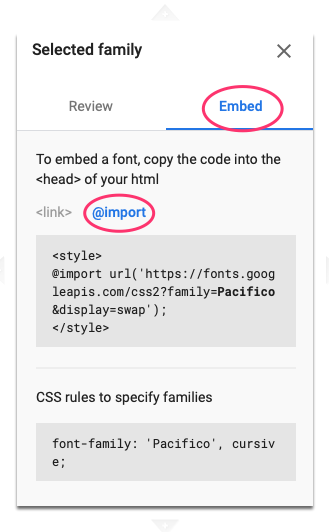
To get started, navigate to Google Fonts and find the font you’d like to use on your WordPress site. Click “select this font” and then “Embed” under Selected Family, and then @import.

You don’t want the <link> for your WordPress site: think about that for a minute and see if you can mentally explain why we won’t use that.3.
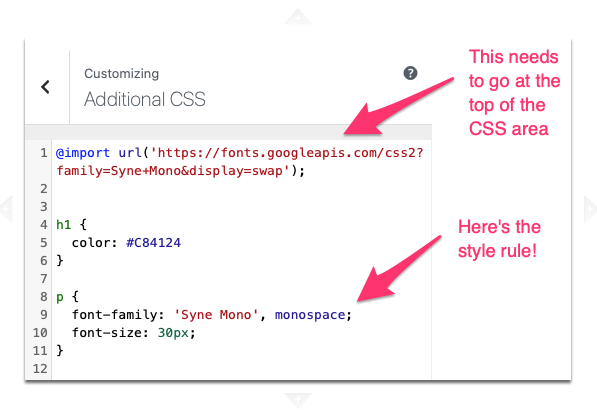
Next, you are going to copy the @import url from between the two <style> tags. Again, think for a minute about why we don’t want those two <style> tags in our CSS document.4 Paste that @import URL at the top of the Additional CSS area of your WordPress site. Then, copy the CSS rule from Google Fonts and apply it to whatever element your are trying to style. See below for an example of how it should look!

As with just about everything in WordPress, there are a thousand different ways you could do this, but this method should be all most people need.↩
One of the many benefits of learning the stuff we cover in this class is that things you’re charged for at WordPress.com are free with self-hosted WordPress!↩
The Additional CSS area on WordPress reads CSS, not HTML. The
<link>is an HTML element, so it won’t work in our CSS.↩Yup, that’s right:
<style>is an HTML element that we use when creating an internal stylesheet. Since the Additional CSS input area reads CSS and not HTML we do not want to include them.↩