It is possible that you did this exercise already if you took 4010 or 6010. If so, feel free to use your previous work as a starting point, but please redo the exercise and think about ways to improve on the previous version. Wouldn’t it be cool if you could build the calculator on top of an image of an actual calculator for example?
Free Code Camp is an excellent resource for learning basic Javascript concepts and techniques, but that learning becomes much more valuable when you put it to work inside of an actual html document. In this exercise we are going to draw upon those first few Javascript lessons in freecodecamp.org to build a calculator.
This exercise isn’t really about math. The process of building your own calculator will actually teach you a lot about numeric and string variables in addition to a tiny bit about math.
Connect js to html and split the screen
- Create a new folder named basicJavascript.
- Create a new html document named calculate.html in the basicJavascript folder.
- Inside of basicJavascript, create a new folder named js.
- Create a new file called calculate.js file inside the js folder.
- Connect calculate.js to calculate.html
- Do this by starting to type (type, don’t paste) “<script src=” after the closing </html> tag. Once you start typing the name of your js file, your code editor will show you options. Browse to calculate.js, and select it. Make sure that you close your script tag.

- Do this by starting to type (type, don’t paste) “<script src=” after the closing </html> tag. Once you start typing the name of your js file, your code editor will show you options. Browse to calculate.js, and select it. Make sure that you close your script tag.
- At this point we recommend that you use your code editor’s split screen option, and open calculate.html on one side and calculate.js on the other side.
Build the html document
- Let’s start by adding a button to the body of the page.
- Give the button an id of “addButton”
- Add some text to the button between the tags. You can say “add” or something to that effect. Your button should look similar to the image below.
- Next, add three input fields with the following attributes:
- type number, id “input1”
- type number, id “input2”
- type text, id “output”
- At this point you have two number fields, one text field, and one button. Before we move on, a bit of formatting and labelling would be in order. You can make your own decisions on how to best present everything. The first two fields, input1 and input2 are for inputting numbers to be added. The third field, output, will ultimately show the sum of those numbers. The purpose of the addButton should be obvious.

Javascript task one: identify the fields and buttons
In order to get information from your text fields and act on that information with the button, Javascript needs to know ‘who they are’ so to speak. We will accomplish this introduction via the querySelector method.
Open calculate.js and on the first line enter the variable declarations shown below. The main thing for you to understand about this process is that you are creating new variables with the ‘let’ command, and are using document.querySelector to tie those new variables to the id(s) of your button and textfield elements.
The first line,
let input1 = document.querySelector('#input1');creates a variable named input1 that is equal to the textfield with the ID #input1, and the other three lines follow the same pattern.

Javascript task two: Create a function
Our next task is to come up with a way to retrieve the values that are entered into the input text fields, add those values together, and then put the resulting sum into the output field. We will accomplish these tasks within a function and then call that function with the add button.
The screen capture below shows one way to go about this task.
- On line one of the add function, a variable named addition1 is tied to the value of the input1 variable that was tied to the the #additionInput1 id in the previous step.
- Line two works just like line one for the other input value.
- Line three adds the two numbers from the text field
- Line four places the sum value into the output text field.
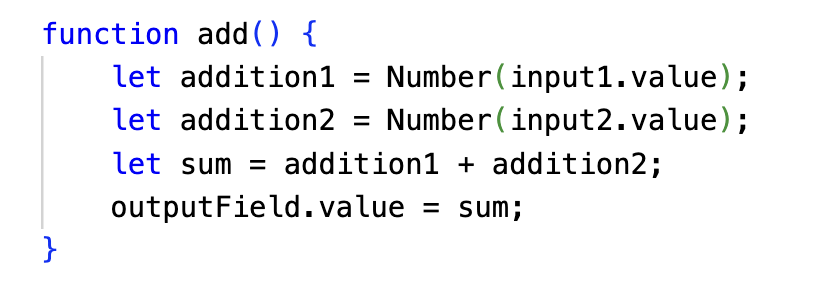
Note: We had to add “Number” to establish the input type again. Javascript automatically assumes that the input type is a String.
Javascript task three: Call the function
Now that you have a function the next step is call it with the button. You may already know how to call a function directly from a button, as in
<button onclick="add()>, but this method is frowned upon in the serious Javascript community. The preferred method is shown below.
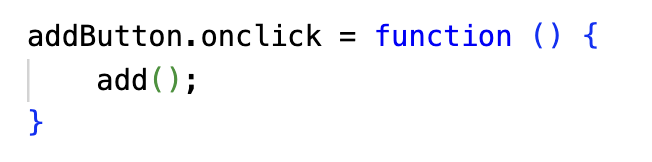
Or, use an arrow function to accomplish the same thing.

More Functions (and more buttons)!
Now that you know how, create three additional functions that divide, multiply and subtract the same values from the same fields. Then add three additional buttons and use those buttons to call the three new functions. Once you finish, you should have a functional (but funky) calculator!
Concatenation 🐈⬛
Imagine that your calculator is a financial calculator, and we would like all of the values to appear with a $ (dollar sign) in front of them. Easy! Just change the lines that say
outputField.value = sum;to
outputField.value = "$"+sum; When you test your calculator again the dollar sign should be appended to the front.
You have now “concatenated” the dollar sign and the sum.
Make it look better
OK, so your calculator works but I bet it’s ugly. Your job now is to use CSS to make it look as good as you possibly can. Have at it!