Lists are the Swiftui equivalent of Uikit’s tableviews. This lesson focuses on how to build the simplest possible list that includes text and images, and leads to a new view with additional information when a row is clicked.
- Create a new swiftui project named candidates.
- Click on ContentView.swift and activate Live Preview. You should see “Hello World” appear.
- Download this list of presidential candidates from the 2016 election, unzip the file, and open the candidates folder that appears.
- Open the pix folder so that you can see the images.
- Return to Xcode and drag all of the images from the pix folder into assets.xcassets.
- Return to ContentView.swift.
- Open candidates.js and copy the candidateNames, candidatePix, and candidateInfo arrays. Paste the arrays into ContentView, just underneath struct ContentView : View { .
- Command click on the text field and select embed in list as shown below.
(BTW, at first attempt I couldn’t get the Embed in List option to appear. Once I opened canvas it showed up for some reason)
- If you are successful, your code should look like this:

and Hello World should appear 5 times in a tableview. Take note of “item in” on the first line of the list. Soon we will use “item” to pull and display sequential data from those three arrays. - Set the length of your list to the number of items in an arraty. Your next job is to replace the 5 in List(0 ..<5) with List(0 ..< candidateNames.count). Now you should see many more Hello World statements in the preview. List(0 ..< candidateNames.count). creates the list and sets its length based on the count of the candidateNames array.
- Change Text(“Hello World”) to Text(candidateNames[item]) .
Item in Text(candidateNames[item]) targets the array of candidate names that provides content to the list. As you are about to see, item in can be applied to multiple arrays at once. - Click preview to test your work. If a table full of names appear, congratulations! Now click on the
 button to activate scrolling. Pretty soon, you should be able to scroll through all of those long forgotten names from the chaotic 2016 presidential campaign.
 - Command click on Text and embed in Hstack.
- Add the images from candidatePix to the list as shown below. At this point the candidate pictures should appear beside their name

- Congratulations. You just created a tableView with images. Now click on Text next to (self.candidateNames[item]) and use the Attributes inspector to choose the Large Title font (or just type it in).
- Add a spacer ( Spacer() ) between the text and image items to make everything line up better.


 button to activate scrolling. Pretty soon, you should be able to scroll through all of those long forgotten names from the chaotic 2016 presidential campaign.
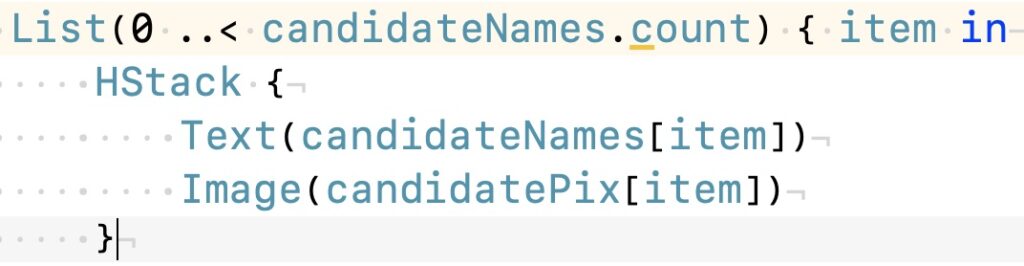

Add Navigation
Now that we have created a simple listview, the next step is to make those table cells clickable and generate new data when someone clicks them. The first step is to embed our list in a navigation view.
- The navigation view begins just before the list as shown here. Unless you know a trick that I don’t (please tell me if you do :), you will have to type this one in.
and, of course, requires a closing bracket just after the bracket that ends the list itself.
- Now that you have added a navigation view, you should see a space above the list of candidates in the canvas preview pane. That space exists for you to give your navigation a title, so let’s give it one. Add the navigation bar title shown below just after the bracket that ends the list and before the bracket that ends the navigation view. Name it anything that you want!

Now you should see your title. - The next step is to add a NavigationLink as shown below. In this case our destination is simply a text field which will appear as a separate view once the button is clicked. Be sure and add a closing bracket in the right location (figure it out 🙂 ). You may also need to restart the preview.

- Get it to work? Great, now modify things to include a large title font when you click on one of those names.
- Embed the text field inside of NavigationLink in a VStack and add
- an image field and
- an additional text field that displays information about each candidate from the candidateInfo array. You may need to add additional lines using .lineLimit in order to display all of the information.
- Once you get everything working, make sure the text is formatted nicely.
- GIVE THIS ONE A GOOD SOLID TRY ON YOUR OWN.
- If you get stuck, here’s yet another screen capture that shows my work.
 and, of course, requires a closing bracket just after the bracket that ends the list itself.
