The Workflow We’re Using
In this course, you’ll use a focused Git workflow:
- Accept an assignment via GitHub Classroom
- Clone the repo to your Mac
- Add your existing project files (if necessary)
- Commit your changes as you work
- Push to GitHub
This page will walk you through this workflow, along with a couple troubleshooting steps you might find useful.
1. Accepting an Assignment via GitHub Classroom
When an assignment is ready, your instructor gives you access to your own private copy of it — see “Getting Access to Your Assignments” on Getting Started with GitHub if you haven’t read that yet. You’ll get an email and/or a GitHub notification (bell icon, top-right of github.com); open it and click Accept invitation.
That’s the whole step — no Terminal, no commands to run. Once accepted, the repo shows up under github.com → your profile icon → Your repositories, and you’re ready to clone it below.
2. Cloning the Repo to Your Mac
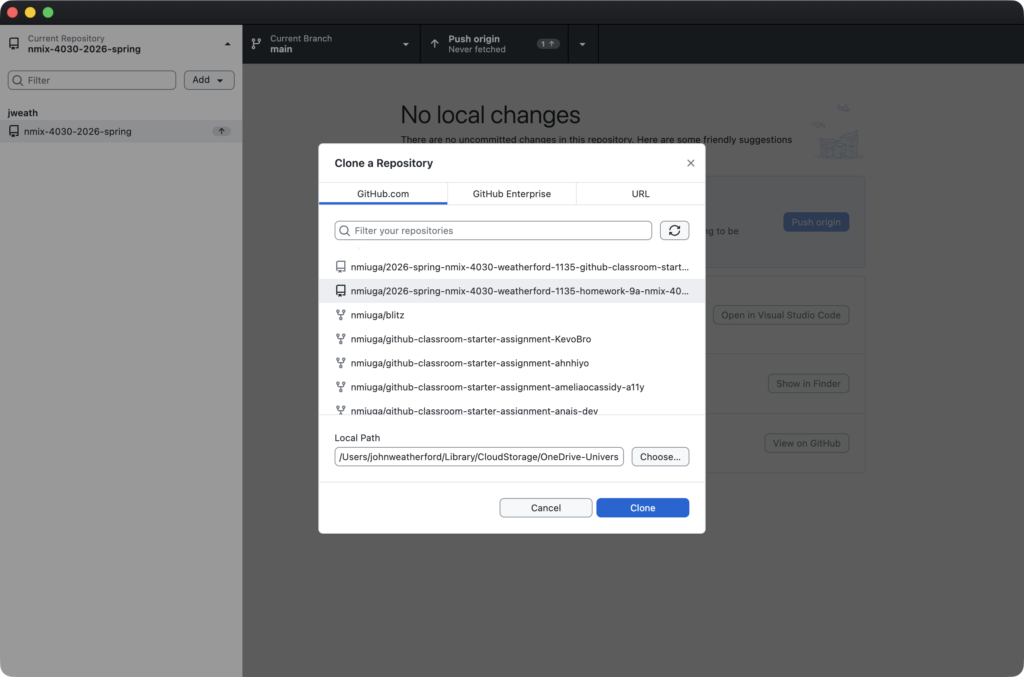
Cloning a repository creates a linked local copy of the assignment on your Mac. Any commits you make locally can then be pushed back up to GitHub.
- In GitHub Desktop, go to File > Clone Repository
- In the modal dialog, select GitHub.com and select the assignment repository you just accepted. (Click the Refresh icon if you don’t see it yet.)
- Select a folder on your Mac in the Local Path picker toward the bottom of the modal — anywhere works, but it’s worth keeping all your assignment repos together in one place, e.g.
~/Documents/NMIX4030. - In the Clone As… field, be sure to use the provided name for the destination folder, for example, project-one-uga12345
- Click Clone.
3. Adding Existing Project Files (if necessary)
After cloning, you may need to add local files to your repository. To do so:
- In GitHub Desktop, go to Repository → Show in Finder to open the folder
- Copy or move the contents of your Xcode project folder into the repo folder
GitHub Desktop will immediately detect the new files and show them in the Changes tab. Green + icons indicate new files; yellow dots indicate modified files; red − icons indicate deleted files.
4. Making a Commit
A commit is a snapshot of your project saved to your local repo. It does not go to GitHub yet — commits are local until you push them.

In the Changes tab, make sure all files you want to include are checked. Then write a clear commit message in the Summary field. A good commit message is brief but descriptive — it answers what changed and why:
- ✅
Add initial Xcode project files - ✅
Fix layout constraints in Main.storyboard - ❌
stuff - ❌
final final FINAL

Click Commit to main. The changes are now saved locally. You can make as many commits as you like before pushing — think of them as checkpoints.
5. Pushing to Origin (Submitting)
Pushing sends your local commits up to GitHub. After committing, a Push origin button appears in the toolbar with a count of commits ready to upload.

Click Push origin. Your commits are now on GitHub and visible to your instructor — this is your submission. There’s no separate “submit” button or step; whatever is pushed to main when the assignment is due is what gets graded, so push often rather than only once at the end.
6. Checking Your Submission
Not sure if your push actually went through? Two ways to check:
In GitHub Desktop: go to Repository → View on GitHub. This opens your exact repo directly in the browser — no need to type or remember any URL. Look at the file list and the timestamp on the latest commit; if what you expect to see is there and recent, you’re good.
From github.com directly: click your profile icon (top right) → Your repositories. Every assignment repo you have access to shows up there automatically.
If a repo looks empty or out of date, that almost always means you committed but forgot to push — go back to GitHub Desktop and click Push origin.
7. Troubleshooting
Rolling Back to a Previous Commit
If you introduce a bug or want to undo recent work, you can revert a commit. Switch to the History tab to see your full commit log.

Right-click the commit you want to undo and choose Revert Changes in Commit. This creates a new commit that reverses the selected one — your history stays intact, which is important if you’ve already pushed.

Deleting a Local Repo and Re-cloning
If your local repo gets into a bad state, or you need to move to a different computer, you can always delete the local copy and re-clone from GitHub — all commits you pushed to GitHub are safe.
- In GitHub Desktop, right-click the repo name in the left sidebar and choose Remove — this removes it from GitHub Desktop only, it does not delete your files yet
- In Finder, locate the repo folder and move it to the Trash
- Repeat 2. Cloning the Repo to Your Mac to create a new local copy.
Your repo on GitHub is untouched. Re-cloning gives you a clean local copy with the full commit history.